Hello and thank you for joining me as we cover basic setup for someone using Windows.
This is Lesson 3 of my class Nix Basics Fast, a crash course in the essential terminal commands you will need to be a successful programmer, IT, DevOps, or Dev Ex engineer. I’m so glad you are joining me today.
In this lesson, I’ll cover basic ideas around keyboards, modifier keys, the difference between the Powershell prompt and the Linux promp, intalling & setting up Windos Subsystem for Linux (WSL), and learning to interact with the linux system called Ubuntu.
In addition, we’ll cover what the control and meta keys mean for Linux.
If you have a Mac operating system, please skip this lesson and see Lesson 2.
The agenda for today is:
- Keyboard concepts
- Installing WSL & Ubuntu
- Working with Ubuntu
- Updating Packages
- Keystroke Modifier Keys
Keyboard Concepts
To start with Linux, you’ll need a Terminal. A terminal is a window that you will type commands in. We’ll get to Terminals in just a minute, but first let’s talk about your keyboard.
The characters or keys you type are called keystrokes. If you type characters normally, the Terminal window typically will accept what you type as letters to be inserted. These keystrokes are called non-modified, because you aren’t using a modifier key to make the keystroke.
What is a modifier key? Most of us are already familiar with the shift key. The shift key will produce the uppercase letter instead of the lowercase letter on the keyboard.
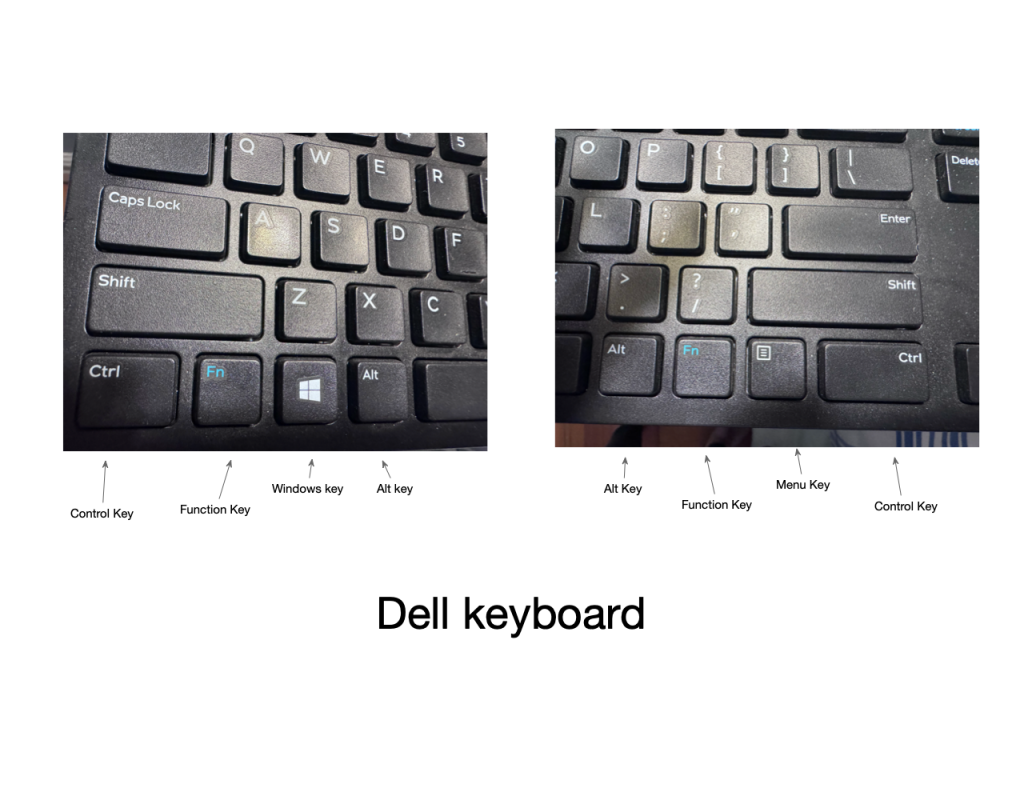
Let’s take a look at the other keys on your Windows keyboard now. A different keyboard will have some of the modifier keys in different positio ns, but they generally stick to similar icons on each modifier key and typically are found in similar places.
on my Lenovo laptop here, moving from left to right on the lowest row of the keyboard, I have the control Key (marked CTRL), the function key (marked Fn), the Windows key marked with a little Windows logo, and the Alt key marked Alt
On my keyboard, the Alt and the Control keys also appear on the right side of the spacebar. You can typically use either one when it appears twice on your keyboard.


Let’s take a look at the other keys on your Windows keyboard now. A different keyboard will have some of the modifier keys in different positio ns, but they generally stick to similar icons on each modifier key and typically are found in similar places.
On my Lenovo laptop here, moving from left to right on the lowest row of the keyboard, I have the control Key (marked CTRL), the function key (marked Fn), the Windows key marked with a little Windows logo, and the Alt key marked Alt
On my keyboard, the Alt and the Control keys also appear on the right side of the spacebar. You can typically use either one when it appears twice on your keyboard.
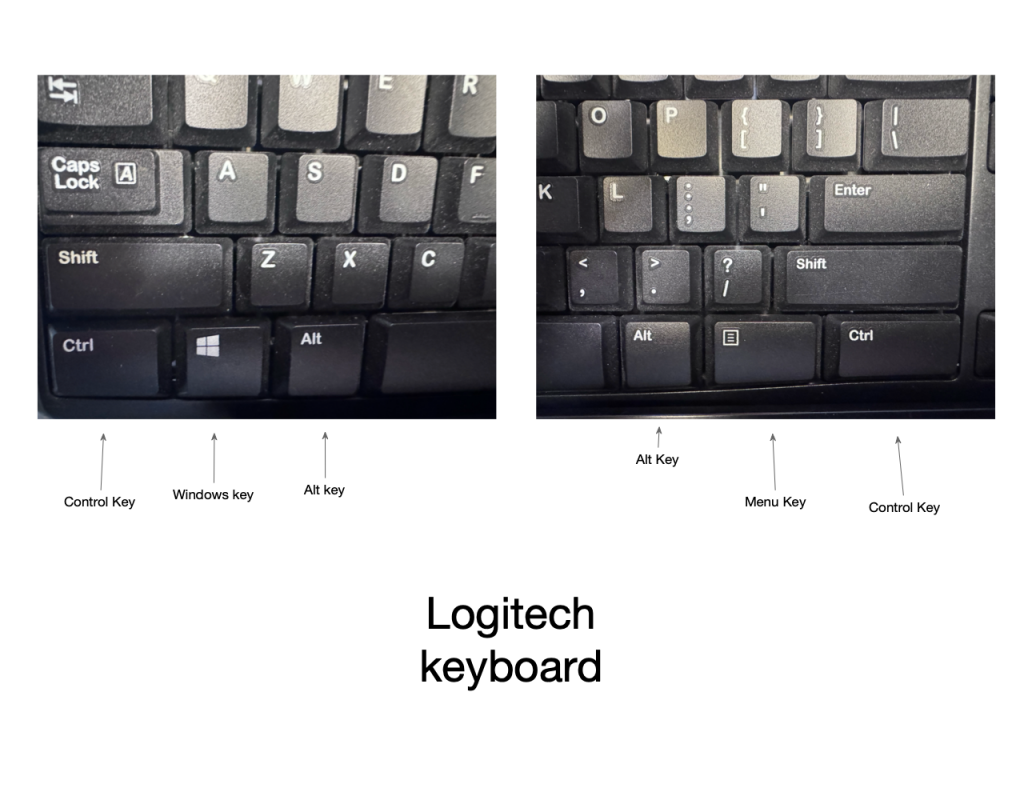
Here are some pictures of other keyboards where the keys are in slightly different places.
Special Characters with Shift Key
You can use the shift key to type the special characters that appears above the normal character on your keyboard. For example, all of the numbers on your standard keyboard have cooresponding special characters: Shift-2 produces an @ symbol, Shift-3 produces a # symbol.
For programmers these symbols have special names. Let’s go over the special names of the special characters associated with the numbers on your keyboard.
Remember, the names of these special characters are specific to hackers and the programmer community. The names are typically not used by non-programmers.
| What you press | How it looks | Commonly called | What programmers call this character |
| Shift 1 | ! | exclamation mark | bang |
| Shift 2 | @ | At symbol | whirlpool |
| Shift 3 | # | Pound or hatch* symbol | mesh, hash |
| Shift 4 | $ | money sign | money, dollar, big money |
| Shift 5 | % | division symbol | percent, mod |
| Shift 6 | ^ | Footnote symbol | carrot |
| Shift 7 | & | ampersand | ampersand |
| Shift 8 | * | astericks | star, splat |
| Shift 9 | ( | Open paren | Left paren |
| Shift 0 | ) | Close paren | Right paren |
Here are a few others you should note. Take note that programmers call { and } the “brackets” and [ and ] the “braces”. If you cannot remember the difference between “brackets” and “braces” (which is easy to confuse in your head), the “square” and “curly”. We will often “enclosed in curly brackets” or “square braces” to talk about wrapping a part of code or configuration.
| Shift-comma | < | Less than | Less than |
| Shift-period | > | Greater than | Greater than |
| [ key (not modified) | [ | open brace | Open brace, open square brace (or “square bracket”) |
| ] key (not modified) | ] | close brace | close brace, close square brace (or “square bracket”) |
| Shift-[ | { | open bracket | open bracket or curly bracket |
| Shift-] | } | close bracket | close bracket or curly bracket |
| / | / | slash | forward slash |
| \ | \ | reverse slash | backslash |
| Shift-backslash | | | Vertical bar, pipe | pipe |
When you are talking with other programmers, if you use the programmer names for these characters you will set yourself apart as someone who knows the correct terms.
It will demonstrate to other developers that you are not a n00b (which is programmer speak for newbie) because you have studied the correct names and know how to refer to the special characters using their programmer names.
Windows users often will conflate the words “slash” and “backslash,” sometimes referring to a slash as a “backslash” or a backslash as a “slash.” Note the one that goes from the upper left to the lower right is the backslash, and the one that goes from the lower left to the upper right is the forward slash or just slash.
Installing Ubuntu
Let’s discuss the difference betwen the Powershell prompt and a Linux terminal.
The powershell prompt is the prompt built-in to Windows. It accepts powershell commands, also known as cmdlets, which interact with your Windows operating system. Powershell commands follow a consistent Verb-Noun naming convention.
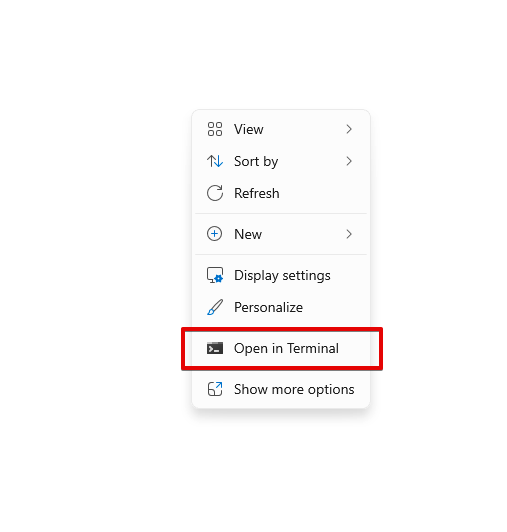
You get to the PowerShell prompt by right-clicking on the desktop -> and then choosing Open Terminal.
Next, type the letters Get-Verb
Notice here that the Powershell prompte returns a list of all the verbs it will accept. These commands, which work similar to what we will learn in Unix, are Powershell prompt commands and are the underlying way to interact with your DOS operating system.
The Unix/Linux commands, on the other hand, are a completely different set of command with their own names and rules. Those operate in a different kind of terminal from the Powershell prompt. They operate in a Linux terminal, which is tied to a Linux distrubution.
The slightly confusing part of this is that you can get into a Linux prompt from within the same Terminal program. You will recognize the Powershell prompt — also called the DOS prompt— because the character you see before the input is >. This terminal accepts DOS commands known as commandlets.
You can also recognize the DOS prompt because it will tell you the current working directory using a C: and between each folder in the hierarchy you see backslashes.
When you are in the Ubuntu shell, although you may be using the same program on the system, you will be in a different shell and will use Linux commands instead of commandlets.
We’ll cover all of that in this lesson and we’ll install Ubuntu to work with WSL.
Generally, for the rest of this course, when I refer to “the terminal,” what I mean is the Linux terminal— the one you haven’t installed yet— and not the Powershell prompt.
To install WSL (to get the Unix terminal I’m talking about), we will use the PowerShell prompt itself. This will be the only thing we do inside the powershell prompt.
This is the standard way you refer to folders and files in UNIX: The slashes separate folder from each other or, for the final slash, it separates the folder containing the file from the file name. Slahes denote the file hierarchy — a directed tree structure where each folder can contain any number of other folders or files. It is called a “directed” tree because it has one direction: from the root of the hard drive down (or up, depending on your perspective) into the folders and files on the system.
Install WSL Using the Powershell prompt
wsl --install
(Remember, you can tell youare in the Powershell because the terminal line looks something like C:\...\...)
This is all you need to do to install Ubuntu.
What is Ubuntu? Ubuntu is a Linux distribution. In other words, a flavor of Linux.
Working with Ubuntu
Next, we’ll switch to the Linux Terminal. Remember, the Linux Terminal looks similar to the Powershell prompt but works with the Linux subsystem we installed.
There are two ways to access Ubuntu. 1) Inside of the windows-provided terminal program, you can type simply WSL and stay right there in that window. We saw this earlier after we first installed Ubuntu, the Terminal switched into the Ubuntu shell instead of the Powershell prompt. You can typically recognize the Linux shell because the character you see before your cursor is a percent symbol.
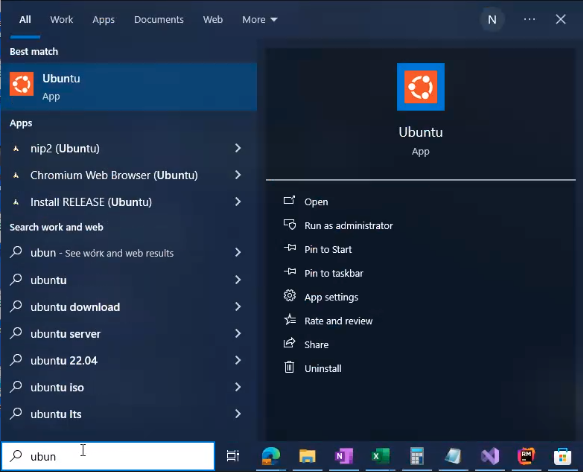
2) The other way to get to Ubuntu is to open it directly as a Windows program. Search for it in the search bar like this. The search bar might be in a slightly different place depending on whether you are using WIndows 10 or 11.
Windows 10 vs Windows 11
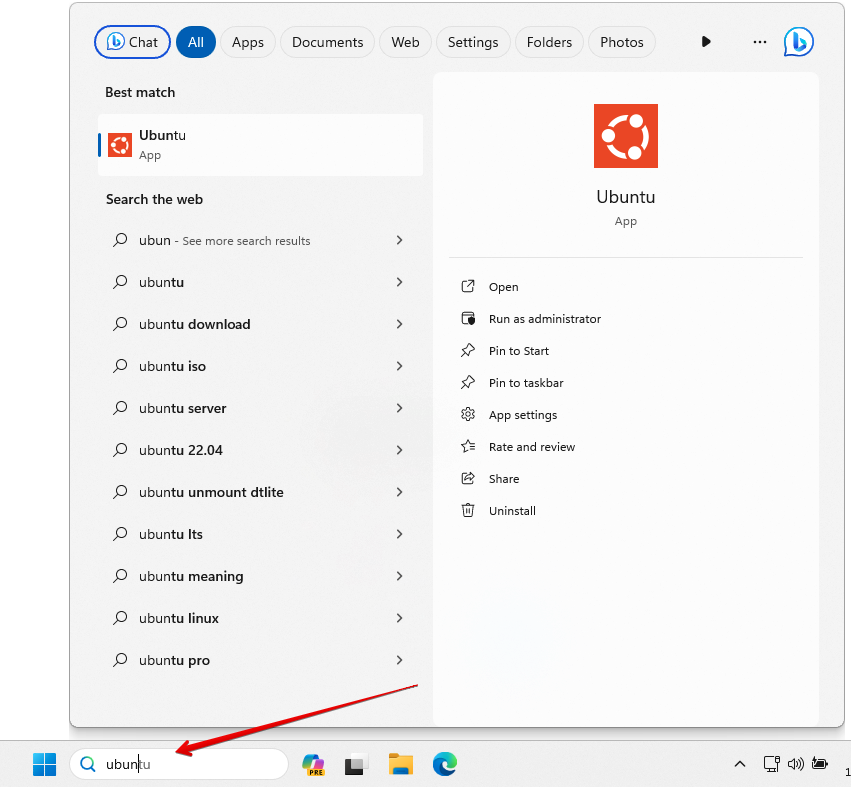
When you find & launch Ubuntu (what we are doing above), it opens like this:
The first thing to do is find where you are on your hard drive, which we won’t even learn until the next lesson.
Type the letters pwd and hit return. pwd is our very first Unix command! It stands for print working directory, and it does just that: prints (displays to the screen) the working directory we are in.
The terminal responds with something like:
This tells you “where you are” in your hard drive. This is the specific folder where your Terminal prompt will use as the directory for any further Unix commands. Specifically, this is referred to as the working directory.
The working directory is the point where you are currently browsing, right there in this terminal session. It is unique to this terminal session. If you start a new terminal window (for example, in another tab or another window), that terminal session will have its own working directory.
We will soon learn how to navigate around the working directory.
Updating Packages
What is a package?
Next, let’s update our packages using a program called apt
Remember, you get here by searching for “Ubuntu” in the applications bar and opening the Linux terminal:
sudo apt update
sudo apt upgrade
This will update and upgrade our installed packages. This is a common thing to do after first setting up a system on any Unix platform. It’s important to periodically update your installed packages so that you are working with current, security-patched packages.
Keystroke Modifier Keys (C- and M-)
At the begining of this lesson, we discussed modifier keys on your keyboard. Specifically, we looked at how you use the Shift key to type the special charactes on your keyboard.
In Linux, we use special modifier keys to move around our Linux terminal.
Let’s review the modifier keys you see on the lower left (and sometimes lower right) of your keyboard.
• fn key (for “function”)
• control key (marked with ^)
• Alt key (also known as the Meta key)
• The Windows key, which in Linux is known as the super key.
For the most part, the Function key and Windows key are used by the operating system and typically not by Linux commands.
When you read Linux documentation, you will notice that Linux keystrokes come in either or a combination of C- (for control key) and M- for meta.
You’ll see markers like these to indicate keystrokes you should type on your keyboard to activate that function.
When a piece of Linux documentation tells says a keystroke begins with C- it is telling you that the modifier key for that keystroke is the control key (marked “control”) on your keyboard. When Unix documentation tells you that a keystroke begins with M-, it is telling you that the modifier key for that keystreak is the meta key. These two are commonly found throughout Linux ecosystem.
But which of the keys on your keyboard is the Meta key?
The meta key is the Alt key on your keyboard. Although some terminal programs allow you to switch the Meta key to a different key, for this tutorial, we’ll just stick with the default.
From now on, when you see C- you know that’s the Control key. When you see M- you know that’s the Alt key.
That wraps up this lesson on installing WSL on Windows. Your windows subsystem for Linux is now set up and ready to be used. in the next lesson, we’ll put the Control and Meta keys to use to use and learn about how to navigate around the termianl shell using special keystrokes.