(Part 1 of 2)
Shakapacker is a strong alternative to both JSBundling and Importmaps. It is the official successor to Webpacker, the gem in Rails 6 that glued Rails to Webpack.
Shakapacker is a complete deployment & development pipeline for developing with Typescript and React, and has several benefits over to JSBundling for React/Typescript development.
Start by choosing whether you want ImportMap-Rails, JSBundling, or Shakapacker to deliver your Javascript & CSS in your app.
If you want a JS Bundling for Rails 7 app, go to this tutorial instead.
If you want ImportMaps for Rails 7, go to this tutorial instead. (The ImportMaps tutorial also discusses further the pros & cons of these 3 options.)
Remember, you can still use Turbo + Stimulus for any of these three choices, but page routing for a single-page app will work differently than it does for Turbo so I recommend you choose between Turbo page routing and React Router. You should only attempt to combine Turbo and React Router if you are separating the two paradigms by section of your website (for example, your client frontend uses React Router and your admin backend uses Rails Turbo.) Do not allow Turbo to work on the same parts of your app that you will manage with React Router; they will not work together.
The goal of this tutorial
• Build a new Rails 7 app using ReactOnRails + Shackpacker (Webpacker) + TypeScript.
• Setup TypeScript with ESLint configuration.
• Create a simple React Component in Typescript, and see how ReactOnRails + Shakapacker offers a complete React/JSX/Typescript out-of-the-box development environment, all while hosted by a Rails 7.
• Understand how to develop with the bin/webpacker-dev-server tool
• Display an image loaded via ES modules using an import statement inside your component. Or style it with CSS using an import statement. (ES modules instead of Sprockets/Asset Pipeline)
Important: The standard ReactOnRails installation instructions will be covered by this post. You may want to refer to these for advanced information, but once we run the command rails generate react_on_rails:install this tutorial will undo some of what the ReactOnRails installer did. These additional steps will demonstrate how to structure your new React-on-Rails code (where to put things). We will delete the “HelloWorld” component that the ReactOnRails installer creates and then create a new basic component by hand. This will show precisely where and how your React app is supposed to hook into ReactOnRails.
1/ Rails 7 New App Skipping Javascript
rails new --skip-javascript MyGreatApp
Skipping Javascript like this will create Rails 7 app that has Sprockets and runs on Puma. These are basic sane default for new Rails-Shakapacker apps and you’ll notice we are not installing Importmaps, Turbo, Stimulus, or JSBundling. We are just calling this app MyGreatApp for demo purposes. For your app, you should call it something meaningful.
SAVE AND COMMIT YOUR CHANGES BEFORE MOVING ON.
2/ Setup Your App
run
./bin/setup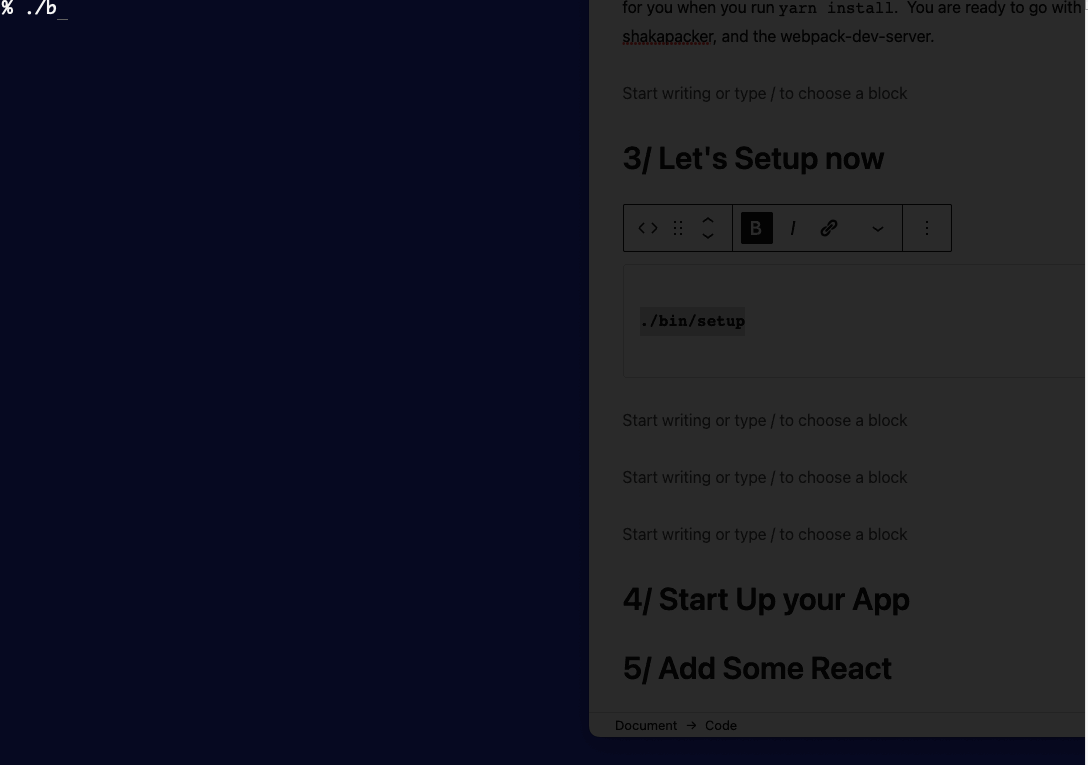
SAVE AND COMMIT YOUR CHANGES BEFORE MOVING ON.
3/ Create a Basic Welcome Controller
- 2.1. Generate a Welcome controller with
rails generate controller Welcome - 2.2. Inside the newly created controller at app/controllers/welcome_controller.rb, add an empty index action. (added test is shown in orange.)
class WelcomeController < ApplicationController
  def index
  end
end- 2.3. Create a file at
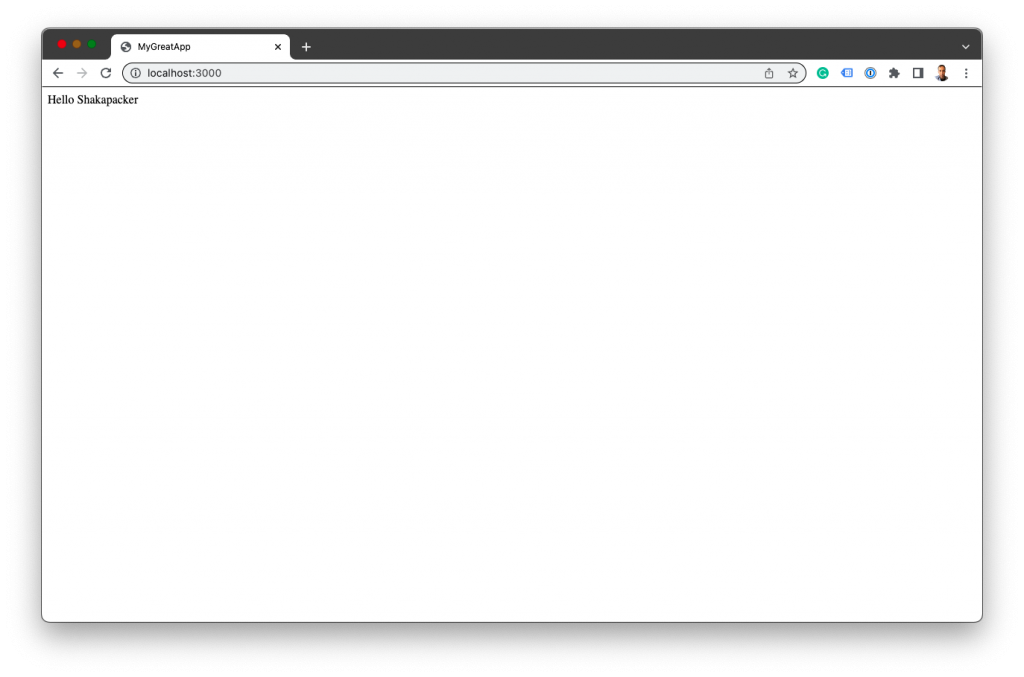
app/views/welcome/index.erbwith the contents “Hello Shakapacker”
Hello Shakapacker- 2.4. Modify the default
config/routes.rbfile to show the welcome controller as the landing page.
Rails.application.routes.draw do
  root "welcome#index"
end
• 2.4. Confirm that when you load your app using rails server, you can see your Hello Shakapacker text. (This will be the last time you use only rails server to boot your app in development.)
SAVE AND COMMIT YOUR CHANGES BEFORE MOVING ON.
4/ Add the Shakapacker and react_on_rails Gems
Add to the Gemfile:
gem 'react_on_rails', '13.1.0' # prefer exact gem version to match npm version
gem 'shakapacker', '6.5.2' # prefer exact gem version to match npm version
Shakapacker recommends you use specific Gem numbers and not fuzzy matchers for both gems. Therefore, you should go to the Shakapacker gem and the react_on_rails Gem before you begin and use the latest version numbers you see on the Rubygems page.
Next run bundle install.
5/ Install Webpacker
bundle exec rails webpacker:install
bundle exec rails webpacker:installBefore we continue, let’s take a deeper look into what the Webpacker (Shakapacker) installer just did:
• The webpacker installer added several things to Gitignore, which means that these folders and anything within them won’t get checked into the repository.
• This sets you up for building packs using Webpacker. Your local development environment will contain packs built by webpacker-dev-server, and also you’ll use Yarn to install local node dependencies.
When you deploy your app, Webpacker is part of your deployment pipeline so that these assets are built for you.
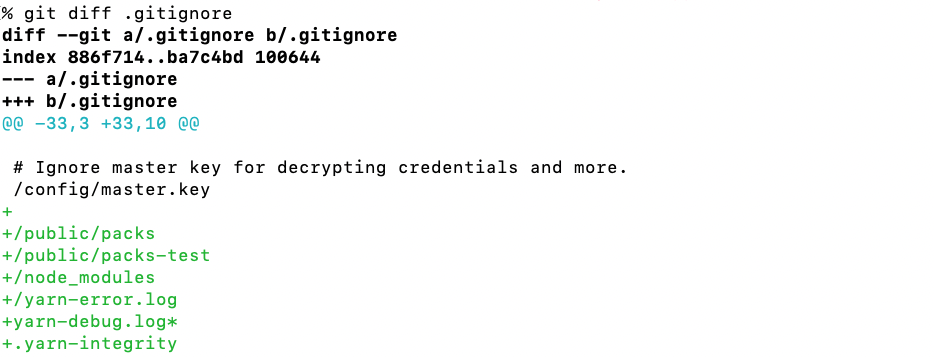
Your app will contain packs that will live in public/packs, but these will be managed by Webpacker and so won’t get checked into the repository. Instead, the node modules will be managed by the package.json file and will be part of your build pipeline.
• To the app/views/layouts/application.html.erb file, the Webpacker installer has added this line:
<%= javascript_pack_tag "application" %>• Next, the installer added to the bin/setup
system! "bin/yarn"• Webpacker added two important configuration files: config/webpacker.yml and package.json
Importantly, two shell scripts have been added. ./bin/webpacker-dev-server and ./bin/webpacker
(To see their contents try more ./bin/webpacker-dev-server and more ./bin/webpacker)
When doing development, you will now need to activate the webpacker dev server in any one of three ways. We will cover that in Section 8
This will mean Babel will compile your Javascript as you develop.
How does this magic happen?
New config/webpacker.yml file was installed by Shakapacker
# Note: You must restart bin/webpacker-dev-server for changes to take effect

default: &default
  source_path: app/javascript

  # You can have a subdirectory of the source_path, like 'packs' (recommended).
  # Alternatively, you can use '/' to use the whole source_path directory.
  source_entry_path: /

  # If nested_entries is true, then we'll pick up subdirectories within the source_entry_path.
  # You cannot set this option to true if you set source_entry_path to '/'
  nested_entries: false

  public_root_path: public
  public_output_path: packs
  cache_path: tmp/webpacker
  webpack_compile_output: true
  # See https://github.com/shakacode/shakapacker#deployment
  webpacker_precompile: true

  # Location for manifest.json, defaults to {public_output_path}/manifest.json if unset
  # manifest_path: public/packs/manifest.json

  # Additional paths webpack should look up modules
  # ['app/assets', 'engine/foo/app/assets']
  additional_paths: []

  # Reload manifest.json on all requests so we reload latest compiled packs
  cache_manifest: false

  # Select loader to use, available options are 'babel' (default), 'swc' or 'esbuild'
  webpack_loader: 'babel'

  # Set to true to enable check for matching versions of shakapacker gem and NPM package - will raise an error if there is a mismatch or wildcard versioning is used
  ensure_consistent_versioning: false

  # Select whether the compiler will use SHA digest ('digest' option) or most most recent modified timestamp ('mtime') to determine freshness
  compiler_strategy: digest

development:
  <<: *default
  compile: true
  compiler_strategy: mtime

  # Reference: https://webpack.js.org/configuration/dev-server/
  dev_server:
    https: false
    host: localhost
    port: 3035
    # Hot Module Replacement updates modules while the application is running without a full reload
    hmr: false
    # If HMR is on, CSS will by inlined by delivering it as part of the script payload via style-loader. Be sure
    # that you add style-loader to your project dependencies.
    #
    # If you want to instead deliver CSS via <link> with the mini-extract-css-plugin, set inline_css to false.
    # In that case, style-loader is not needed as a dependency.
    #
    # mini-extract-css-plugin is a required dependency in both cases.
    inline_css: true
    # Defaults to the inverse of hmr. Uncomment to manually set this.
    # live_reload: true
    client:
      # Should we show a full-screen overlay in the browser when there are compiler errors or warnings?
      overlay: true
      # May also be a string
      # webSocketURL:
      #  hostname: "0.0.0.0"
      #  pathname: "/ws"
      #  port: 8080
    # Should we use gzip compression?
    compress: true
    # Note that apps that do not check the host are vulnerable to DNS rebinding attacks
    allowed_hosts: "all"
    pretty: true
    headers:
      'Access-Control-Allow-Origin': '*'
    static:
      watch:
        ignored: '**/node_modules/**'

test:
  <<: *default
  compile: true

  # Compile test packs to a separate directory
  public_output_path: packs-test

production:
  <<: *default

  # Production depends on precompilation of packs prior to booting for performance.
  compile: false

  # Cache manifest.json for performance
  cache_manifest: true
• The default block applies settings across all environments if the environment doesn’t override the setting.
• The source_paths setting tells Webpack will try to package all of the Javascript files found in app/javascript
• It will be packed into output files located at a relative path packs/, which is what you see in the public_output_path setting.
• Take a look at the different environments: dev_server, test, and production. Notice that the compile setting for development is set to true, whereas for production it is set to false. (We will set this to false for both environments in the next step.)
This is because Shakapacker will compile the bundles during your deployment. Finally, you’ll notice cache_manifest setting is set to true for production.
New package.json file was installed by Shakapacker
{
  "name": "app",
  "private": true,
  "dependencies": {
    "@babel/core": "7",
    "@babel/plugin-transform-runtime": "7",
    "@babel/preset-env": "7",
    "@babel/runtime": "7",
    "babel-loader": "8",
    "compression-webpack-plugin": "9",
    "shakapacker": "6.5.0",
    "terser-webpack-plugin": "5",
    "webpack": "5",
    "webpack-assets-manifest": "5",
    "webpack-cli": "4",
    "webpack-dev-server": "^4.9.3",
    "webpack-merge": "5"
  },
  "version": "0.1.0",
  "babel": {
    "presets": [
      "./node_modules/shakapacker/package/babel/preset.js"
    ]
  },
  "browserslist": [
    "defaults"
  ]
}
You now have Node dependancies for what is listed under dependancies, and Yarn will manage these dependancies for you when you run yarn install. You are ready to go with Babel (@babel/core and several Babel plugins), webpack, shakapacker, and the webpack-dev-server.
SAVE AND COMMIT YOUR CHANGES BEFORE MOVING ON.
6/ Run the React on Rails Installer
rails generate react_on_rails:installIt will tell you there are some conflicts with the Shakapacker install. That’s ok, enter Y (Yes) to overwrite all files.
Now let’s take a look at some of the important changes the ReactOnRails installer has just made
• Changes were made in webpack.config.js to support multiple environments
• Changes were made in config/webpacker.yml. source_entry_path was changed from / to packs
source_entry_path: packsIn the development stanza, the compile setting is now set to false. That means you must run the webpacker watcher to develop as nothing will be compiled on-the-fly.
Also in the development stanza, the hmr (hot module reload) has been changed from false to true. See section 13 for a discussion of Hot Module Reload.
• Several additional node packages were added to package.json. These include @babel/preset-react, babel-plugin-macros, babel-plugin-transform-react-remove-prop-types, css-loader, css-minimizer-webpack-plugin, mini-css-extract-plugin, prop-types, react, react-dom, and style-loader. As well, some dev dependancies node packages were added also.
• There are new Procfiles at Procfile.dev and Procfile.dev-static
• You have a new babel.config.js file which tells Webpacker how to use Babel to transpile your code. Examine the contents of this file now:
// The source code including full typescript support is available at:
// https://github.com/shakacode/react_on_rails_demo_ssr_hmr/blob/master/babel.config.js

module.exports = function (api) {
  const defaultConfigFunc = require('shakapacker/package/babel/preset.js')
  const resultConfig = defaultConfigFunc(api)
  const isProductionEnv = api.env('production')

  const changesOnDefault = {
    presets: [
      [
        '@babel/preset-react',
        {
          development: !isProductionEnv,
          useBuiltIns: true
        }
      ]
    ].filter(Boolean),
    plugins: [
      process.env.WEBPACK_SERVE && 'react-refresh/babel',
      isProductionEnv && ['babel-plugin-transform-react-remove-prop-types',
        {
          removeImport: true
        }
      ]
    ].filter(Boolean),
  }

  resultConfig.presets = [...resultConfig.presets, ...changesOnDefault.presets]
  resultConfig.plugins = [...resultConfig.plugins, ...changesOnDefault.plugins ]

  return resultConfig
}
• You have several Webpack config files at config/webpack/. They handle things like live refresh while developing and other under-the-hood concerns.
• There is an important config file at config/webpack/webpackConfig.js that is concerned with how to create bundles with and without Hot Module Reload.
7/ Delete the HelloWorld component generated code
SAVE AND COMMIT YOUR CHANGES BEFORE MOVING ON.
Delete Generated HelloWorld Controller
In Step 9 (below), we will create a new primary component called ClientApp and hook it into our Rails app. So as not to confuse these steps with the default generated code from the installer you ran in the last step, delete the following files now:
rm app/controllers/hello_world_controller.rb
rm app/views/layouts/hello_world.html.erb
Important: The ReactonRails installer changed source_entry_path to packs/ so the default pack file at app/javascript/application.js will no longer load correctly through Webpack. If you try to reference it, you will get a “Missing manifest error.”
rm -rf app/views/hello_world/In config/routes.rb, remove the line get 'hello_world', to: 'hello_world#index' and revert the routes file to what we had before:
Rails.application.routes.draw do
  root "welcome#index"
end
SAVE AND COMMIT YOUR CHANGES BEFORE MOVING ON.
8/ Move application.js into packs/
Move application.js (which is now at app/javascript/application.js) into app/javascript/packs/
9/ Start Up Your New Dev Environment
You now must start your Rails server in a different way. You have three options:
- Run two terminal windows, one with
rails serverand another with./bin/webpacker-dev-server. (You can also run./bin/webpacker --watch)
2. Run the single command foreman start -f Procfile.dev-static. This will start all of the listed services in Procfile.dev-static using Foreman, so your environment will be up & ready to go.
Either method will start a Ruby process that runs in the background — a daemon — that will continually watch your compiled assets (Javascript/Typescript, images, CSS) and rebuild your pack as you develop. It does this in a Ruby method called Webpacker::DevServerRunner.run(...)
3. As a shortcut, create a shell script at ./bin/dev
This parallels how JS Bundling works.
#!/usr/bin/env bash
if ! command -v foreman &> /dev/null
then
  echo "Installing foreman…"
  gem install foreman
fi
foreman start -f Procfile.dev-static
Make your new file executable with
chmod 0755 ./bin/dev
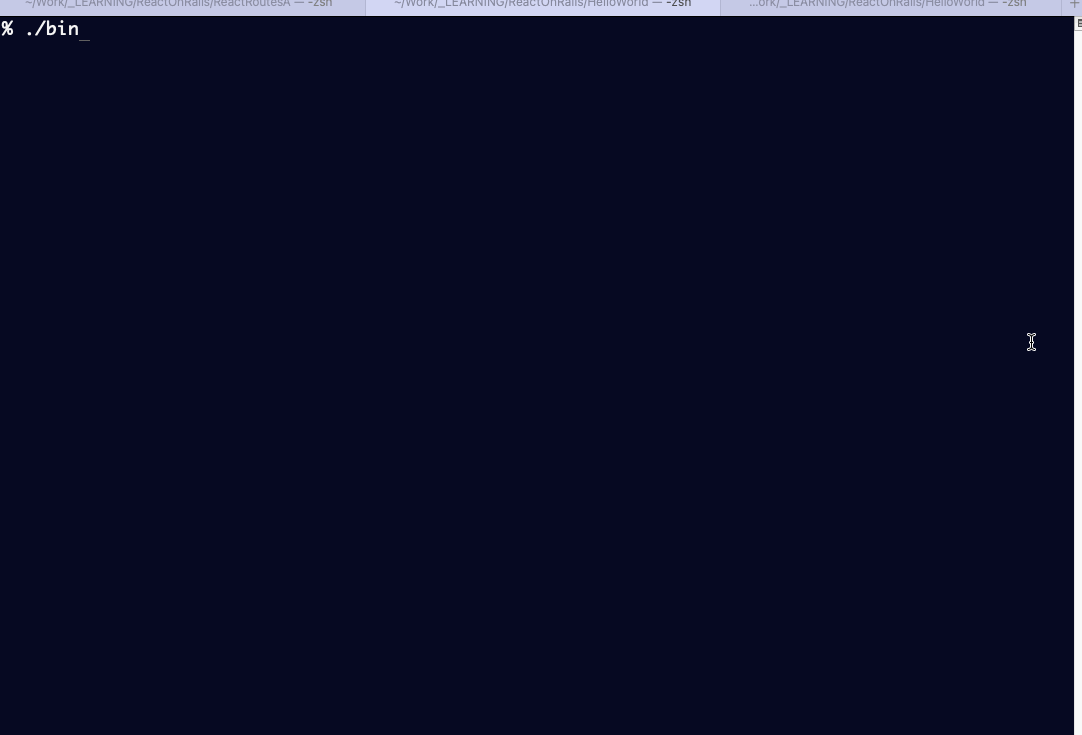
Now you will start both your Rails server and webpack watch with the single command ./bin/dev
Important: If you missed any of the steps in Section 7, you may have compilation problems with Webpack. One of the frustrating parts of working with Webpack is that when you have compilation errors, you will see them only in the build output (in Terminal). You will not see an error or crash when you load the webpage, which can lead to confusing results.
SAVE AND COMMIT YOUR CHANGES BEFORE MOVING ON.
10/ Hook the Default React Component into the App
Add to the app/javascript/packs/application.js file this line:
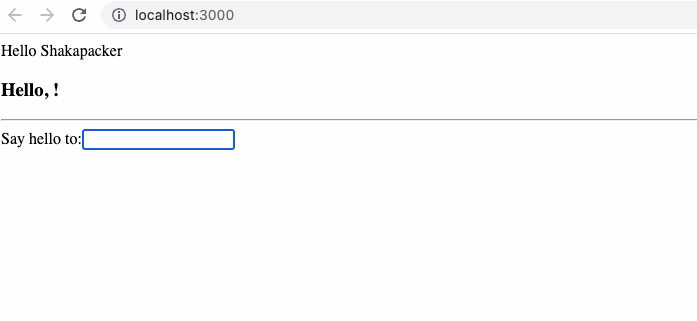
import './hello-world-bundle'Here, add the default HelloWorld react component to the welcome/index.erb file we created earlier (“Hello Shakapacker”)
Hello Shakapacker
<%= react_component("HelloWorld", props: {}, prerender: false) %>
Now when you start ./bin/dev you should see:
As you type, the text above the input box will change: