1/ Be sure to use the EDITOR= flag. Choose vi, emacs, or nano
Get comfortable with nano, emacs or vi. When you run bin/rails credentials:edit be sure to prepend with EDITOR=
Not all editors will work with the command.
You must open the file, make changes, save the file, and edit the editor, then the Rails command will encrypt the changes you just made. (You must get through all the steps successfully and not exit out of edit without saving for it to work.)
If you are not comfortable with nano, emacs or vi, get comfortable with nano, emacs or vi
2/ Running it for the first time will create a file at config/credentials.yml.enc and the new master key (do not run with --environment flag.)
Do not use the --environment flag as some blog posts suggest.
If you’re the architect building the app for the first time, use this command, shown here using the emacs editor. If you are team member coming onboard with someone else’s app, do not run this command. Instead, skip to Step 3.
EDITOR=emacs bin/rails credentials:edit
Notice that 2 files are created:
config/credentials.yml.enc
config/master.key
Notice that config/master.key does not get checked into your repository, but the encrypted credentials do.
When a new teammate joins your team, you will need to securely pass them the key for them to get access to the app. Be sure to use a secure channel (not email!) like GPG encryption.
3/ Understand How Rails Loads Master key
Rails will load RAILS_MASTER_KEY one of two ways:
- If it is available as an environment variable (RAILS_MASTER_KEY), that will be used
- If there is a file at
config/master.key, that file will be read from.
For most cloud environments, you will probably use #1. For local development and when your local tests run, your app will use #2.
If you got the key from your teammate, be sure to put it into config/master.key (use the Rails edit command only after the key is in place.)
It is also OK to put the master key into a not-checked-in file that that create an environment variable— for example. .env or .env.local if you are using Dot-env. However, because this is not the standard Rails setup, most development for Rails apps use the not-checked-in master/config.key file and do have the master key in the environment setting.
“Not Checked-In”
When we say “not checked in,” we mean that the file’s path exists in .gitignore, so git will simply ignore the file, not put it into our repository. That means that when things like the CI or deployment pipeline run to containerize our app, our RAILS_MASTER_KEY isn’t available. That’s why we have to pass it through in-environment secrets instead.
For local development, you’ll have the master key in the secret file, and this description key lives itself in plain text on your hard drive.
That’s why which is why encrypt your laptop and protect it with a password or biometric authentication mechanism. If your laptop is stolen and your hard drive is not encrypted, the hacker could gain full access to all the encrypted secrets.
For Heroku, set the master key as a Heroku ENV variable
This is done using the Heroku CLI here. To get the Heroku CLI, go here. Once installed, be sure to use heroku login, heroku whoami, and heroku logout to get comfortable with using the API.
You should also get comfortable with heroku app — the command that lists the apps your current account has access to. This means you will be able to perform operations and push to those apps. If you have more than 1 app, you must add the app flag to every Heroku command you run — just be sure to add -a and specify the name of your app.
heroku config:set RAILS_MASTER_KEY=xxxxxx -a your-app-name(where xxxxxx is your master key and your-app-name is the name of your Heroku app)
Alternatively, you can also do this on the Heroku web dashboard.
Github Actions
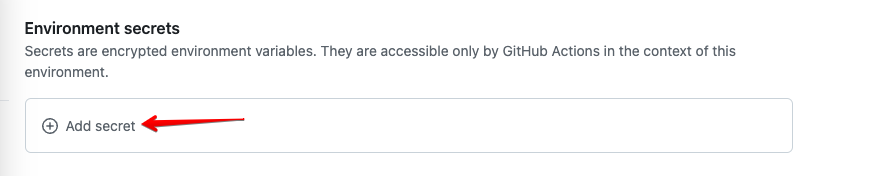
For Github CI, go to the repo Settings > Environments and check for the name of the environment
Under the environment, click Add Secret
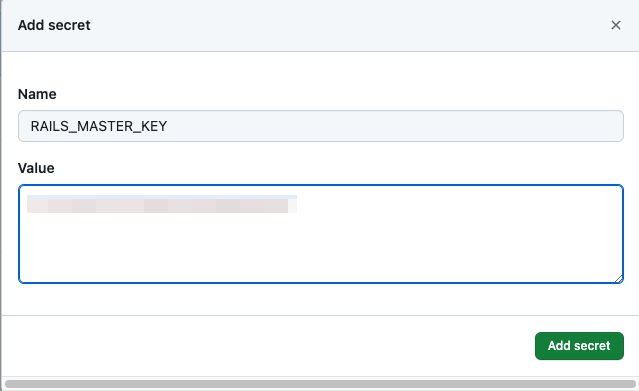
Enter RAILS_MASTER_KEY as the secret name and copy & paste the secret itself from your local file config/master.key
Your workflow file should contain a env: setting to load the RAILS_MASTER_KEY from the secrets into the environments. It looks like this (shown in red):
env:
  RAILS_ENV: test
  DATABASE_URL: "postgres://rails:password@localhost:5432/rails_test"
  RAILS_MASTER_KEY: ${{ secrets.RAILS_MASTER_KEY }}
Then, also confirm that the environment: is set on one level below the job run (for example, within the test: job).
In your workflow definition, you will probably have job named test: one level indented below the setting for steps:
Make sure that this test: setting contains an environment setting (put it below but on the same indentation as the runs-on setting), and the name specified here matches what you set above in Github.
  test:
    runs-on: ubuntu-latest
    environment: testing
3/ Some 3rd party credentials will apply globally, and some will be specific to 3rd party‘s sandbox, testing, or staging environment, but you don’t necessarily map them 1-to-1 to Rails environment
External APIs like Plaid, Stripe or another external API which gives you a ‘testing’ API key and a ‘production’ API.
Choose which Rails environment uses which key— not necessarily on a one-to-one relationship. For example, for my Plaid integration, I have staging, Hereku preview environments, and development all set to use the sandbox credentials provided by Plaid.
Plaid API Example
In this example, I’m using the Plaid API. The Plaid API provides a client_id that is global to my whole account, but it then provides different api_keys for each Plaid environment of production, sandbox, and development.
Then I reference it using
configuration.api_key['PLAID-CLIENT-ID'] = Rails.configuration.plaid[:client_id]Plaid then provides a Plaid-environment-specific API key: one for Production, another for development, and a third for something Plaid calls sandbox. The same is true for public_token
I want my development, staging, and any Heroku preview environments to use the sandbox Plaid environment. These, instead, are provided on a per-environment basis.
if Rails.env.development? || Rails.env.test?
  plaid_env = :sandbox
elsif Rails.env.production?
  plaid_env = :production
end
ENV['PLAID_ENVIRONMENT'] = plaid_env.to_s
configuration.server_index = Plaid::Configuration::Environment[plaid_env.to_s]
configuration.api_key['PLAID-CLIENT-ID'] = plaid_env.to_s
configuration.api_key['PLAID-SECRET'] = Rails.application.credentials.plaid[plaid_env][:secret_key]

PLAID_API_CLIIENT = Plaid::ApiClient.new(
  configuration
)

PLAID_API = Plaid::PlaidApi.new(PLAID_API_CLIIENT)
Notice that I do not set different environment settings per Rails environment. Instead, I check if the environment is development or test and use the Plaid sandbox if it is (otherwise using Production).
My (de)crypted credentials for this setup look like:

Stripe Example
Stripe provides two set of keys: one for “test_mode” and another for “live” mode.
I’ll set a secret_key and a publishable_key, and I’ll choose test mode or live mode based on Rails environment. My Rails app environments are configured like so:
config/environments/staging.rb
  config.stripe.secret_key = Rails.application.credentials.stripe[:test_mode][:secret_key]
  config.stripe.publishable_key = Rails.application.credentials.stripe[:test_mode][:publishable_key]
config/environments/development.rb
  config.stripe.secret_key = Rails.application.credentials.stripe[:test_mode][:secret_key]
  config.stripe.publishable_key = Rails.application.credentials.stripe[:test_mode][:publishable_key]
config/environments/production.rb
  config.stripe.secret_key = Rails.application.credentials.stripe[:live][:secret_key]
  config.stripe.publishable_key = Rails.application.credentials.stripe[:live][:publishable_key]
My (de)crypted credentials for this setup look like:
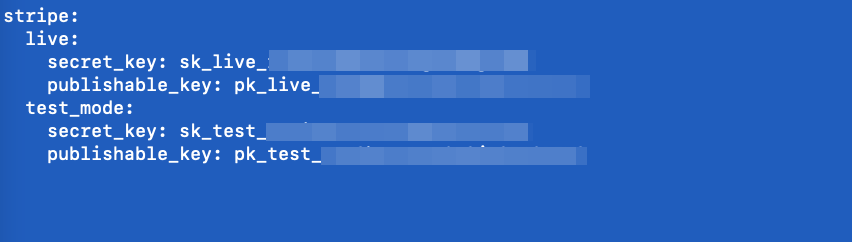
Notice that development and staging share the same settings: “test mode”. The Rails production uses Stripe “live” mode keys.
Notice that for the Plaid example, there was one piece of data that was not environment-specific, but for the Stripe example, all of the data was environment-specific. This shows you how you can work with different APIs that have different kinds of data.
4/ Do I have to keep things in Rails encrypted secrets if they aren’t secrets?
No. The short answer is you do not, but I recommend putting all external API secrets into them.
There may be some grey are with regard to how staging vs. production environment should act, and I wouldn’t go putting trivial, non-key/non-secret that would determine different behaviors across environment settings into Rails credentials. (For example I may often use HTTP in development and HTTPS in staging/production, but I don’t put that setting into an encrypted secret, I write that into my envrionment files directly).
For the times when you don’t need encrypted secrets but you do want distinctions between dev & prod, you have two choices:
- Put the setting into each Rails environment in
config/environments/* - Create an initializer at
config/initializers/and check the current environment in your initializer, then decide which credential (or non-credential) piece of information to use.
It’s mostly up to you here, bu the most important thing is not to check -in API keys or secrets directly into the source control unencrypted. Putting them into the encrypted secrets method meets this requirement.
5/ Warning: Dev-Prod Differences are the Devil
Use these tools wisely! Reduce differences between dev & prod. Reduce differences between dev & test. Differences between prod and staging should be only reflective of the 3rd party (for example, credit card transactions on the fake payment gateway for staging and the real gateway for production).
Often a 3rd party API may provide a 3rd kind of environment (sometimes called “Sandbox” as in the case of Plaid), which will operate an a more short-feedback way for local development. In those cases, I typically set development to use sandbox, staging to use the 3rd party’s staging, and production to use the 3rd party’s production.