
So you probably want to know about useState in React 16.18 and if you do you’ve come to the right place.
I’m gonna break it all down for you, we’re gonna talk about useState, we’re gonna talk about hooks, we’re gonna talk about destructuring today so sit back and let’s dive in.
useState is a good place to start with understanding hooks.
PREREQUISITE KNOWLEDGE
this lesson relies on you understanding the following four basic concepts of ES6:
variables
Today we’ll just use a const.
What a ternary is — in this lesson I’ll use a ternary that is based on a variable called isActive.
If isActive is true, the ternary returns #E3A which is the hex color for PINK and if isActive is false the the ternary returns #FFF which is the hex color for white.
We’ll see what an arrow function is. A quick reminder that when an arrow function is passed a single value without curly braces, you don’t use the ‘return’ keyword.
When you do use the curly braces, remember to use the return keyword because Javascript will not explicily return from that function.
Finally, you’ll see at the top & bottom of our files the standard import-export.
Always remember to import the top-level modules you use as well as functions you want to use in your code.
In this case, we’ll just import React itself and useState from React.
And then we’ll export at the bottom.
Here I’ve just written export default thing but in the real example, I will export the name of the actual component.
EXAMPLE 1: A SIMPLE TOGGLE BOX
Start with the default create-react-app.
npx create-react-app my-basic-toggle-box
Remove the default code in app.js and app.css
Create a new component as a stateless functional component. The component will be called toggleBox
import './App.css';

function App() {
  return (
    <>
    </>
  );
}

export default App;
So the next thing to do is define a ToggleBox
const ToggleBox = () => {

  return (
    <>

    </>
  )
}

export default ToggleBox
Remember always to include export default.
From the stateless functional components, whatever is returned becomes the rendered content.
Test this in your browser and confirm that you see nothing and no error. You don’t see anything because you didn’t even put a toggle box inside of the App yet. Let’s fix that:
import './App.css';
import ToggleBox from './toggleBox'

function App() {
  return (
    <ToggleBox />
  );
}

export default App;
Be sure to import ToggleBox from './toggleBox' because we want to use it in this module.
Then also note that when referenced, the closing slash in <ToggleBox /> is not optional: This means the component is self-closing.
(You could also write <ToggleBox /> </ToggleBox> if you had any content you wanted to pass into the ToggleBox component. This syntax allows you to create wrapper components that can encapsulate functionality.)
Now let’s focus on ToggleBox. I want to create a box that when I click, it will toggle on and when I click again it will toggle off.
We’ll manage this state locally in this functional component using the useState hook.
Since ToggleBox was a functional component, we did not need React to be imported into toggleBox.js earlier.
Now we do, so add this to the top of toggleBox.js
import React, {useState} from 'react'
Inside of the return, we want to render a div, and we’ll call it box by giving it a className, like so:
import React, {useState} from 'react'
const ToggleBox = () => {

  return (
    <>
      <div className={"box"}></div>
    </>
  )
}

export default ToggleBox
Now let’s add a state. The state is going to be called isActive.
import React, {useState} from 'react'

const ToggleBox = () => {
  const [isActive, setIsActive] = useState(false);
  return (
    <>
      <div className={"box"}></div>
    </>
  )
}
Here I’ve created two constants: isActive and setIsActive.
Both are destructured from the return value of useState(false);
In this case, false is the default value for our state (isActive). We pass the useState hook the default value of false.
Notice that here we are destructuring, or “pulling out of” the return value, isActive and setIsActive
We have now the state and also a way to set the state.
Next I want to display the background color of this box to be pink if it is active.
Then set the background color based on whether or not it is active.

EXAMPLE 2: The Weather App In A Single Component
In the next example, things get a little bit more complicated: You’ll need to understand all three of useRef, useEffect, and this hook, useState. We will compose the three hooks together to create a single component that will do one simple thing: It will input your ZIP code (postal code) and it will tell you the current weather condition and temperature in Fahrenheit.
First, clean out app.js so it is almost empty:
import './App.css';

function App() {
  return (
    <div className="App">

    </div>
  );
}

export default App;
Next, create a new component called WeatherApp.js
import React, {useState, useRef, useEffect} from 'react'
const WeatherApp = (props) => {
const [zip, setZip] = useState(undefined);
const [forecastSuccess, setForecastSuccess] = useState(false);
const [forecast, setForecast] = useState(undefined);
const [fahrenheit, setFahrenheit] = useState(undefined)
// set this in .env
const OPEN_WEATHER_MAP_API_KEY = process.env.REACT_APP_OPEN_WEATHER_MAP_API_KEY
const fetchForecast = (zipCode) => {
// TOOD: implement me in the next step
}
useEffect(() => {
fetchForecast(zip)
}, [zip])
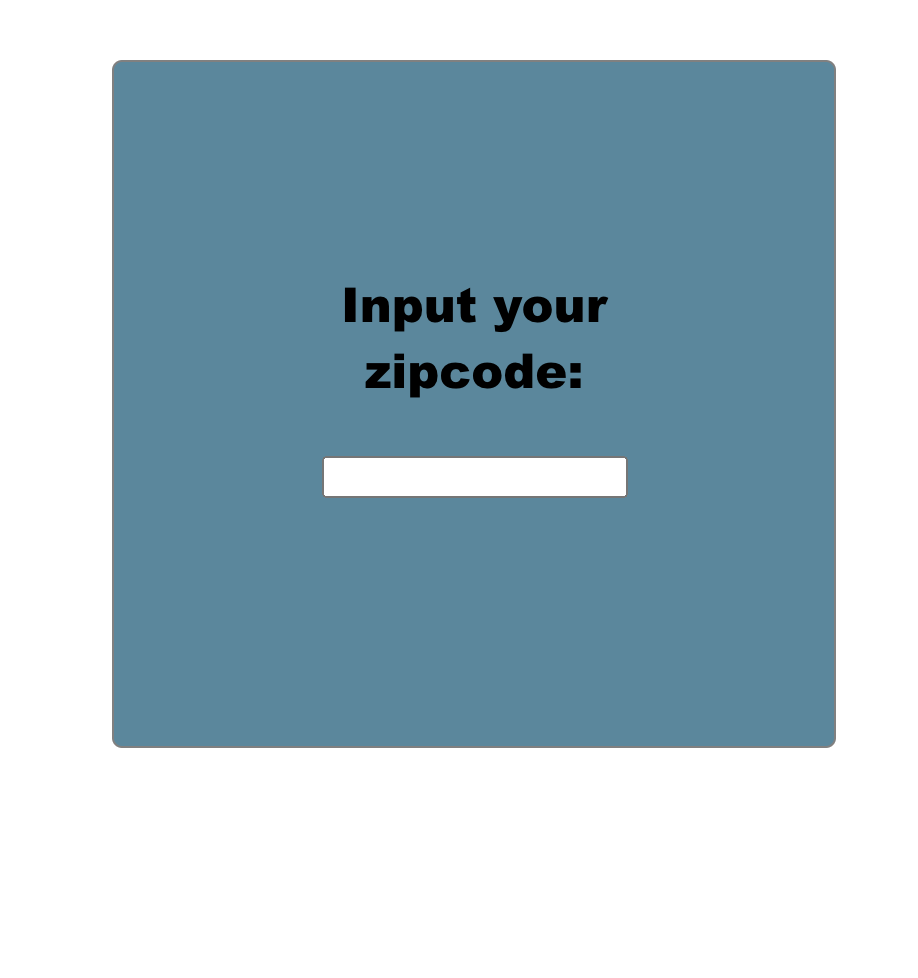
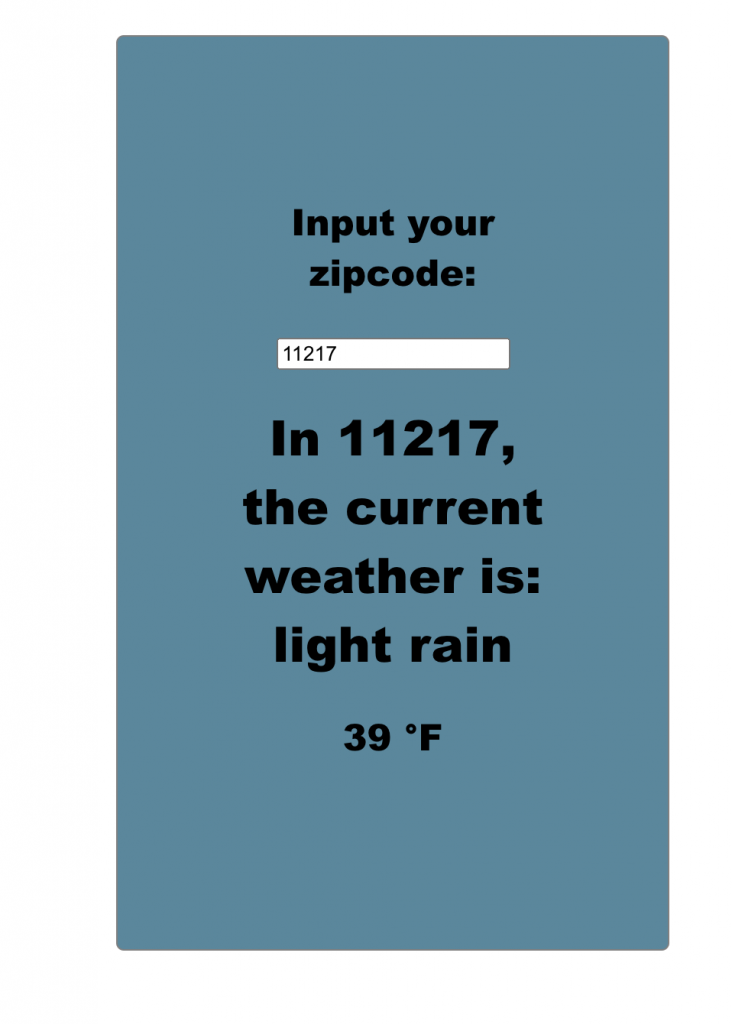
return (
<>
<p>Input your zipcode:</p>
<input name={"zip"}
onChange={(event) => setZip(event.target.value)}
/>
<br />
<h1>
{ forecastSuccess && `In ${zip}, the current weather is: ${forecast}`}
</h1>
<h2>
{ forecastSuccess && `${fahrenheit} °F`}
</h2>
<br />
</>
)
}
export default WeatherApp;I know it might look a little intimidating at first. Before we dive in, you’ll need an API Key from OpenWeatherMap.org.
Once you have it, create a new file at .env and put this into it, replacing the xxxxes with your API key.
REACT_APP_OPEN_WEATHER_MAP_API_KEY=xxxxxxxxxxxxxxxxxxxxxxxxxRemember, this .env file is where you will keep your application secrets. Because it begins with a period (.), it will be a hidden file on your file system so you’ll have to know how to navigate hidden files to see it. Create React App will automatically load its settings as long as it begins with REACT_APP_
This is insecure!!!
Because the Create React App setup is entirely client-side code, putting them in env settings like this we expose the secret to the front end. Anyone who examines the code can find our Open Weather Map API Key and steal it from us. In a real production app, don’t do this. This is appropriate only for demo purposes. To not expose your credentials, you will need NextJS and to render React Server components, also known as “server-side rendering.” For a walkthrough of building the WeatherApp using a service component and securely, check out the Cypress & NextJS Example.
Then, as you see on the line here, we load that API key from the process environment:
const OPEN_WEATHER_MAP_API_KEY = process.env.REACT_APP_OPEN_WEATHER_MAP_API_KEY
Let’s yarn start and see what we get:
  const [zip, setZip] = useState(undefined);
  const [forecastSuccess, setForecastSuccess] = useState(false);
  const [forecast, setForecast] = useState(undefined);
  const [fahrenheit, setFahrenheit] = useState(undefined)
Here are our four useState hooks: One for the zip code, another to flag if the API call got a forecast or not, another for the forecast itself (“sunny” or “light rain”), and a fourth for the temperature in Fahrenheit (feel free to implement in the system of your country.)
Next, we have the empty fetchForecast method, which we will implement in the next step:
const fetchForecast = (zipCode) => {
// TODO: IMPLEMENT ME IN THE NEXT STEP
}
Next, we have our only useEffect hook. This hook says: “Fire me whenever the zip changes.” We know it will fire whenever the zip changes because the zip code is the only parameter in the array that is passed to the second parameter of useEffect. If you are not familiar, review the useEffect lesson here.
useEffect(() => {
  fetchForecast(zip)
}, [zip])
Finally, we have one big honky return statement that is the body of the widget:
return (
    <>
      <p>Input your zipcode:</p>

      <input name={"zip"}
             onChange={(event) => setZip(event.target.value)}
      />

      <br />
      <h1>
        { forecastSuccess && `In ${zip}, the current weather is: ${forecast}`}
      </h1>
      <h2>
        { forecastSuccess && `${fahrenheit} °F`}
      </h2>
      <br />
    </>
  )
Here we have the meat of the app: The input box where you will enter your zip code. It has as its attributes an important onChange that will set the zip.
Then, we use some smart conditional rendering to display the results only when the forecastSuccess is set to true. If this looks unfamiliar to you, know that the boolean forecastSuccess isn’t output to the screen. It is just determining whether or not the second thing in the statement is. This is called conditional rendering, and you can read about it in the conditional rendering lesson.
What happens if we put in a zip code?
Nothing will happen yet because we haven’t implemented fetchForecast
Now let’s add an implementation for fetchForecast to make it work:
const fetchForecast = (zipCode) => {
  fetch(`//api.openweathermap.org/data/2.5/forecast?zip=${zip}&appid=${OPEN_WEATHER_MAP_API_KEY}`)
    .then(res => res.json())
    .then(
      (result) => {
        if (Number(result.cod) === 200) {
          let k_temp = result.list[0].main.temp;

          setFahrenheit(Math.trunc((k_temp - 273.15) * 9 / 5 + 32))

          let condition = result['list'][0]['weather'][0]['description']
          setForecast(condition);
          setForecastSuccess(true);
        } else {
          setForecastSuccess(false);
          setFahrenheit(undefined);
          setForecast(undefined);
        }
      }
    )
}
Here, we call up OpenWeatherMap.org and see if they can give us a result. If the result code of the HTTP request was 200 (success), we assume they got a result for us and proceeded to pick through the result to temperature and weather conditions.
If it was unsuccessful, we see the forecastSuccess flag as false and also set the Fahrenheit and forecast to undefined. This last step is probably unnecessary because they won’t get displayed anyway, but it is good hygiene to keep the state current.
The finished demo app looks like this:
State Updates are Scheduled
One important catch is that all state updates are scheduled.
This only gets important when you want to update more than one state sequentially, and one state will depend on the updated value of another state
That means that when the interpreter gets to the line of code where you want the state to be updated, you can’t be guaranteed that the state variable itself hasn’t been updated.
In these cases, useState takes a functional call instead of an argument.